Coelliptic rendezvous: the orbital ballet
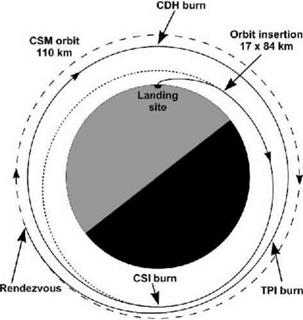
For the early Apollo missions, NASA settled on the coelliptic rendezvous to carefully reunite the two spacecraft. To best grasp the various elements of this technique, it may help to work backwards from the rendezvous itself and see how its demands determined the orbital dance around the Moon that led up to it.
NASA standardised how it would fly the final part of the rendezvous – what it termed the terminal phase – to control the approach speed of the LM. They wanted to limit the speed to a value that could be dealt with by the RCS thrusters of either spacecraft, ft is worth remembering that by this point in its mission the LM was a very light spacecraft and its thrusters were very responsive. The CSM, on the other hand, was heavy and still had a substantial load of propellant on board. Its thusters were much less effective, should it be called upon to fulfil the rendezvous. Another issue was illumination. Theoretical studies and Gemini experience had demonstrated that the terminal phase should be flown over 130 degrees of the CSM’s orbit, with appropriate approach speeds set throughout this period to maintain control of the situation. Therefore, planners could choose where in the CSM’s orbit they wanted the rendezvous to occur, and with lighting taken into account, work back 130 degrees to define the point where the terminal phase ought to begin. This point would be where the LM would execute the terminal phase initiation (TPI) burn. One huge advantage of this approach was that as the LM rose to meet the CSM. the latter would appear to be stationary against the background stars. In one sense, the two craft would be on intersecting orbits hurtling around the Moon at nearly 6,000 kilometres per hour. But in another, inertial sense that ignored the Moon below, they would be approaching along a straight line that could be drawn out to the stars. This arrangement would allow the crew7 to visually check their progress. Because of the need to be able to see the stars clearly, most of the terminal phase was arranged to occur in the Moon’s shadow7, but the final approach would be made in sunlight for improved visibility. Additionally, opportunities were included during the approach for course corrections, based on data from their radar.
Continuing to work backwards, planners arranged for the LM to spend about 40 minutes in an orbit that was a constant 28 kilometres below7 the CSM’s orbit. An important point to note is that this constant difference in height had to be maintained even if the CSM’s orbit was elliptical. NASA used the term constant delta height (CDII) for this part of the rendezvous trajectory, and as the LM crew7 had to make a burn to shape their orbit to meet this condition, the manoeuvre was obviously known as the CDII burn. The purpose of this part of the flight was to give the crew time to track the CSM and calculate the burn that would be needed at the start of the terminal phase of the rendezvous. If the orbits of both spacecraft leading up to the CDII burn were nearly circular and the errors were small, then it was possible to dispense with this manoeuvre.
The trajectory leading up to the CDII burn was essentially a circular orbit of 84 kilometres altitude which was entered by the coelliptie sequence initiation (CSI) burn. This burn w-as made half an orbit back from where the CDH burn would occur.
As we continue to work backwards, the only section that remains is the time from launch to the CSI burn. Around the time that the CSM passed over the landing site, the LM ascent stage lifted off from the discarded descent stage. The ascent engine burned for about seven minutes, ideally to achieve an orbit with a perilune of 17 kilometres and an apolune of 84 kilometres. Half an orbit after insertion, the spacecraft had coasted to its apolune. at which point the CSI burn would circularise the orbit and the coelliptie rendezvous would begin. Except for the initial ascent, all the burns would be made with the RCS thrusters.
To summarise this sequence chronologically:
• After launch, the LM entered a 17 by 84-kilometre orbit.
• It coasted for half an orbit until it reached apolune. The crew then made the CSI burn to circularise the orbit and then began to track the CSM.
• After another half orbit, they made the CDH burn, if required, to reshape the orbit and have the LM fly 28 kilometres below the CSM’s orbit.
|
Diagram of the coelliptic sequence rendezvous technique. |
• During a 40-minute coast, further tracking determined the details of the burn that would begin the terminal phase.
• The TPI burn placed the LM on an intercept trajectory that was, at least for a short period, essentially a transfer orbit. It raised the orbit’s apolune slightly higher than the CSM’s altitude so that it would intercept its target over 130 degrees of orbital travel.
As the LM rose to meet the CSM during the terminal phase, the rendezvous radar on the LM continually worked with the transponder on the CSM to determine their separation and their rate of closure. The crew monitored these values using the PGNS and the AGS, searching for any hint that they might be deviating from their preferred trajectory – which was a straight line in terms of inertial space, this being implied by the fact that they held the target fixed against the stars. There were two opportunities for mid-course corrections, then the commander made a series of braking burns using his thrusters to bring their closing speed to zero as the LM pulled up alongside the CSM, thereby never reaching the notional apolune of the orbit of which the start of the terminal phase was a short arc.
On Apollo 12, Pete Conrad, like all the other Apollo commanders, did most of the actual flying as he monitored Intrepids return to orbit by watching the PGNS and making burns based on its results. Meantime, to his right, A1 Bean was never really given the chance to pilot anything, which was normal on an Apollo mission. Despite being the lunar module pilot, his role was more that of a flight cngincer/co – pilot, although in extreme situations he could take over using the controls that were provided at his station. His chief task was to operate the AGS in case this backup guidance system had to be brought in to control the spacecraft. Like the PGNS. it generated numbers that reflected its determination of their trajectory, which he compared to the answers coming from the primary system. At any point in the rendezvous, usually after they completed an important step, the LMP could update the AGS’s knowledge of where they w’ere, with that from the PGNS assuming, that is, that everyone w-as happy with the performance of the PGNS. The AGS w’ould then continue to determine its independent trajectory from that point onwards.
As a test in Apollo 12. Bean w’as to try and operate the AGS entirely separately from the PGNS to see if it were possible. Unfortunately, a misskey on the run up to the CSI burn meant that he had to make one update from the PGNS after which he resumed the test. Bean found it to be quite exhausting: “After CSI, we realigned the AGS to the PGNS. Then I made all the AGS marks after that just as we’d planned to do, and got solutions that all compared very favourably. This show’s that the AGS w’ould do the job, would get solutions, w’hich we. of course, suspected anyhow-. But the whole point is that you dona want to use the AGS as the normal rendezvous mode. It requires that every two or three minutes, you make a lot of entries in the AGS. It requires that you point the spacecraft exactly at the command module, which takes time and effort. The LMP is working continually and isn’t able to sit back and think through exactly what’s going on in the rest of the spacecraft.”
Bean wished his role in operating the AGS could have been less manual. Of all the LM crewmen, this man. who w-as to become an accomplished artist, perhaps deserved more than others a little time to absorb the experience. During his debrief, he related how Conrad had been sensitive to his needs: "I continued to work to input the data into the AGS until the second mid-course [in the terminal phase] when Pete said, Tley. why don’t you quit working and sit back and enjoy the flight?’ I got to thinking about it later and that was the first Lime I’d really looked out to see what was going on. The rest of the time I’d just been w’orking my fanny off trying to get all those marks into the AGS. and that’s not the way you want to fly a spacecraft.”
Years later, he told how Conrad had offered him the controls over the far side of the Moon. Out of earshot of mission control. Bean experienced how: the light spacecraft, with its main tanks nearly empty, responded keenly to every impulse from the thrusters. At last, a lunar module pilot had been allowed to pilot a lunar module.
The step-by-step coelliptic rendezvous took nearly two orbits to fulfil but it gave crew’s plenty of Lime to Lake optical and radar measurements of the angle and distance to their quarry, to evaluate their progress and to calculate burns that minimised the risk of errors placing them into a dangerous orbit. It also permitted greater flexibility if the CSM had to perform a rescue. For this possibility, and as a
|
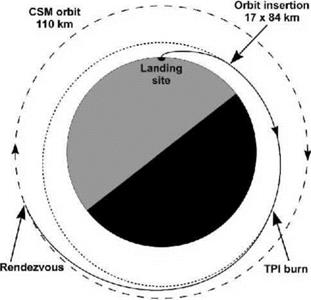
Diagram of the direct or short rendezvous technique. |
backup, the CMP in the passive CSM was kept busy making his own determinations of their orbit in permanent readiness for a LM abort.
The coelliptic rendezvous used for Apollos 10, 11 and 12 took nearly four hours to execute, which was a significant amount of time in a spacecraft whose total working life was itself measured in mere hours. When the advanced missions added a six-hour moonwalk to the last surface day, such a rendezvous would keep the crew awake for nearly 24 hours. In the hiatus imposed by the Apollo 13 incident, Scott and Irwin experimented in the simulators to see whether they could shorten the rendezvous, and the arrangement that they devised, which removed an entire orbit lasting two hours, was successfully demonstrated by the Apollo 14 mission.


