Apollo 17
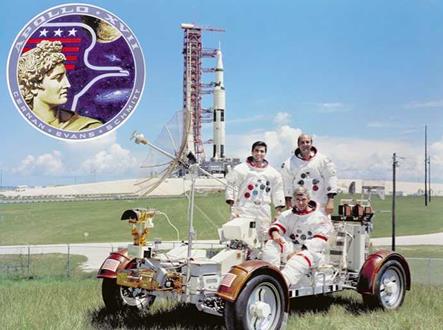
Crew: Commander Gene Ceman CM Pilot Ron Evans LM Pilot Dr. Harrison Schmidt
Command Module America Lunar Module Challenger
Accomplishments: Last Moon landing. Longest lunar stay of 74 hours and 59.5 minutes. Returned 243 pounds of lunar samples.
|
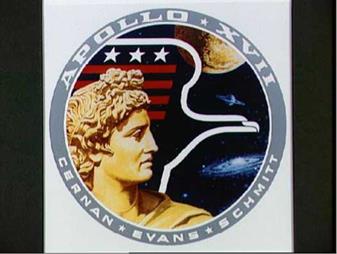
Fig. 9.1 Apollo 17 Insignia. Courtesy of NASA |
|
|
The Apollo 17 landing in the Taurus-Littrow Valley was the last Apollo mission, with Apollo 18, 19, and 20 terminated due to budget cuts. As of this writing, Apollo 17 proved to be the last time man set foot on the Moon. Apollo 17 was the final J-type mission, distinguished from the previous G – and H-series missions by expanded and improved hardware, a larger instrumentation package, and extended exploration and sampling range using the Lunar Roving Vehicle, or LRV. The primary objectives of Apollo 17 were threefold:
• Conduct geological observations and collect samples of the Taurus-Littrow region for data of the specific area. The Apollo 17 mission collected Taurus – Littrow information for comparison with geologic data from the previous Apollo mission regions. This objective was aided with the extended range provided by the LRV. The LRV carried onboard two experiments, the Lunar Traverse Gravimeter (LTG) and the Surface Electrical Properties (SEP) experiment.
• Deploy and activate a new version of the Apollo Lunar Surface Experiments Package, or ALSEP, that included five experiments not previously deployed by the earlier Apollo missions. The ALSEP included a heat flow experiment; lunar seismic profiling experiment (LSPE); lunar surface gravimeter (LSG); lunar atmospheric composition experiment (LACE); and lunar ejecta and meteorites (LEAM).
• Conduct lunar orbiting experiments from Apollo 17’s Service Module, including a lunar sounder, infrared scanning radiometer, and far-ultraviolet spectrometer.
Apollo 17 was the first and only Apollo mission that included a scientist as part of the crew. Geologist Jack Schmitt served as the LM pilot, with veteran Astronaut Gene Cernan serving as the Apollo 17 Commander and flying the LM. Both Gene Cernan and CM pilot Ron Evans received extensive training in geology and lunar science, with Ron Evans concentrating on visual recognition and observation of geological features from long distance.
The original crew assignment was Gene Cernan, Ron Evans, and Joe Engle, a former X-15 pilot credited with 16 X-15 flights. Three of Engle’s X-15 flights exceeded the altitude of 50 miles which earned him astronaut wings prior to his joining Apollo. The normal NASA practice was to have the backup crew of a mission be the primary crew three missions later. Cernan, Evans, and Engle served as the backup crew for Apollo 14, and as such were the primary crew for Apollo 17. Jack Schmitt was originally scheduled for Apollo 18 as the LM pilot. With the cancellation of Apollo 18, 19, and 20, there was pressure to include a scientist on Apollo 17. Thus, Schmitt replaced Engle as the LM pilot for Apollo 17. Prior to the Apollo 17 mission, Jack Schmitt’s claim to fame was cleaning up a transmission verbal faux pas of Astronaut Tom Stafford on Apollo 10 by rephrasing Stafford’s description of a crater as “bigger than Schmitt!”.
Joe Engle would never fly to the Moon, but he did fly as commander on Space Shuttle STS-2 with Shuttle pilot and future NASA Administrator Richard Truly, and as mission commander of STS-51-1. Engle is the only astronaut to fly both the X-15 and the Space Shuttle winged spacecraft into space, and to control and land the Space Shuttle manually.
The LM Challenger landed within 200 m from the planned landing coordinates. Three EVA’s were conducted, with the first EVA tasks including: the deployment of the ALSEP, deployment of the first set of geophones and explosive charges as part of the LSPE, and conducting a cosmic ray experiment using the Cosmic Ray Detector (CRD). During the second EVA, Astronauts Cernan and Schmitt used the LRV to collect core samples, dig trenches, and traverse from Nansen Crater, Lara Crater and various points along the way. These stops were made along the way to collect data from the Lunar Traverse Gravimeter (LTG) and the Surface Electrical Properties (SEP) experiment, and deploy additional LSPE geophones and explosive charges. The third EVA, additional sampling stops and traverse gravimeter measurements were made. Additional geophones and explosive charges for the LSPE were deployed, and the EVA ended with the retrieval of the neutron flux probe from the deep drill core hole. Each EVA lasted over 7 hours.
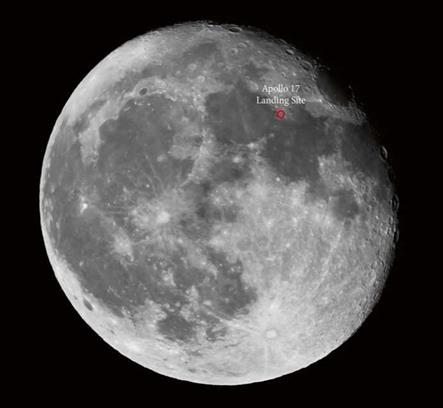
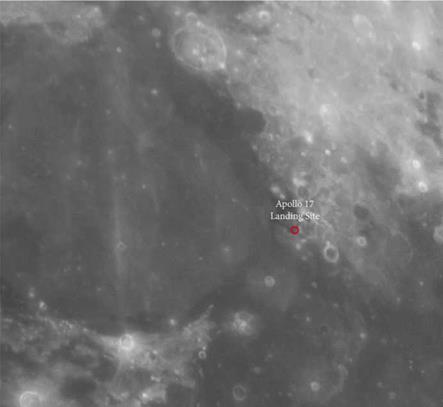
The Taurus-Littrow Valley is fairly easy to identify with a telescope. The site is at the southeastern rim of the Sea of Serenity and intersects the Sea of Tranquility.
|
|
The landing site selected for Apollo 17 was in the Taurus-Littrow Valley on the southeastern rim of Sea of Serenity. Obtaining samples that would determine how this region of the Moon formed particularly interested lunar scientists in this landing site. The two primary objectives were obtaining samples of highland material that were older than the Imbrium impact and investigating the possibility of young, explosive volcanism in this region. Taurus-Littrow was one of several sites considered, along with the Tycho crater, Copernicus crater, and the Tsiolkovsky crater on the far side of the Moon. The Tycho crater was considered too dangerous because of the roughness of the terrain. Copernicus crater was a low priority site. A far side mission to Tsiolkovsky crater created significant communications problems, with the necessity of placing a constellation of expensive communication relay satellites in orbit around the Moon to provide continuous communications with Mission Control and the command module. The Taurus-Littrow site was selected with the anticipation of sampling ancient highland material and young volcanic material in the same landing site. The Taurus-Littrow site also provided the sampling of Tycho ejecta, and geologists suspected some of the craters in the area could be volcanic vents.
|
|
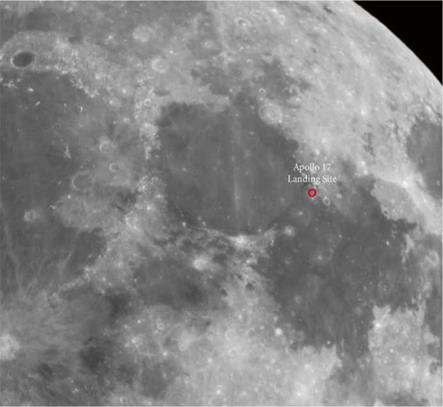
As an observer increases magnification, under steady seeing, the landing area can be seen to have both lighter or darker material. The geologists referred to this material as light mantle and dark mantle material, stemming from suspected lava flows.
|
Fig. 9.5 Zoom-in on the Apollo 17 landing site. Courtesy of the author |
The chosen landing site is in an area between two geological massifs, or mountain masses, where observational evidence showed dark material from either landslides or pyroclastic deposits. This dark mantle material is covered with small craters, which scientists at the time postulated either volcanic or meteoric in origin. The results of the Apollo 17 geological studies suggest that approximately 100 million years ago, lava seeped to the Moon surface and flooded and pooled to form the Taurus-Littrow area and Sea of Serenity. The lava flows apparently were accompanied by fire fountains, which formed both orange and dark-colored beads in the soil. Several samples of lunar soil from Taurus-Littrow contained orange glass beads, causing the samples to have an orange hue. Fire fountains also accounts for the dark glassy material collected at the Taurus-Littrow landing site.
|
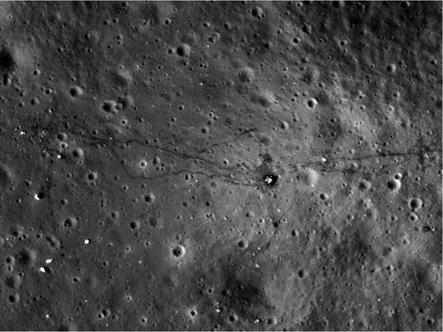
Fig. 9.6 LRO view of the Apollo 17 landing site from 50 Miles Above. Photo courtesy of NASA and Arizona State University |
Figure 9.6 is one of the LRO’s clearest photos of an Apollo landing, with the Challenger’s descent stage clearly visible. Since the Moon has no weather or environmental conditions that can inflict weathering on the soil, the tracks of the lunar rover and the footprints of the astronauts can be easily seen. Unfortunately, this cannot be seen with backyard telescopes. The LRO photographs are taken at an altitude of 50 miles above the lunar surface.
Also visible in this picture is a cluster of craters. It has been determined from the Apollo 17 mission, that much of the main crater cluster was the secondary impact result of the massive Tycho impact less than 95 million years ago. Most of these secondary impact craters were the result of eject spreading out downrange from the Tycho crater. The downrange pattern formed points directed at Tycho. The lighter colored material originated from landslides caused by the secondary ejecta from Tycho hitting the Taurus-Littrow massifs.
Apollo 17 LM Challenger Descent Stage
Fig. 9.7 A closer view from the LRO of the Challenger descent stage. Photo courtesy of NASA and Arizona State University
 |
 Apollo 17 ALSEP LROC NAC M168000580R
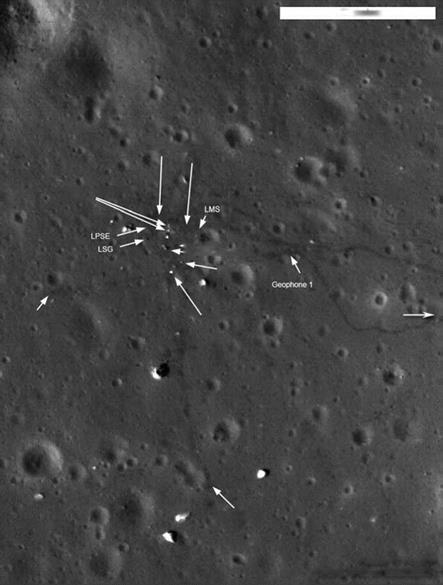
Fig. 9.8 LRO view of the Apollo 17 ALSEP with amazing detail of the Apollo 17 ALSEP setup. The Lunar Surface Gravimeter (LSG) and the Lunar Seismic Profiling Experiment (LSPE) and its four associated geophones can also be seen. Photo courtesy of NASA and Arizona State University
|
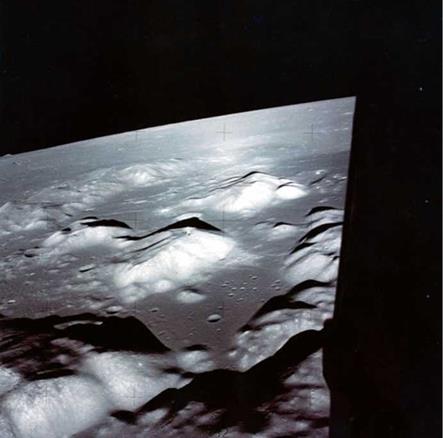
Fig. 9.9 CM pilot Ron Evan’s view of the Taurus-Littrow landing site. Note the massifs that are prominent surrounding the landing site. Courtesy of NASA |
|
Fig. 9.10 This mosaic panorama of the Taurus-Littrow valley shows the mission viewpoint of the landing site. In the distance the massifs that dominate and define the area can be seen. The Lunar Rover and Astronaut Harrison (Jack) Schmitt are also shown in this panorama. Courtesy of NASA |
|
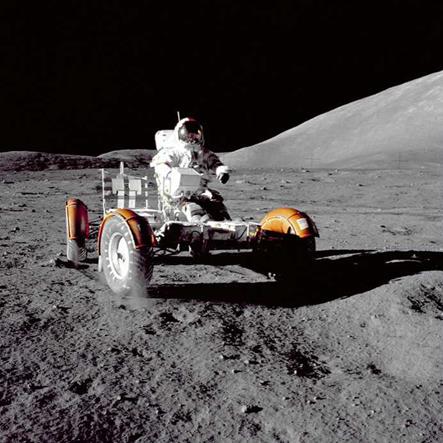
Fig. 9.11 The LRV aka the Lunar Rover |
The Apollo 17 LRV carried onboard two experiments to obtain data during the lunar traverses. One experiment, the Lunar Traverse Gravimeter (LTG) measured the value of the Moon’s gravity around the Taurus-Littrow area. The LTG, by measuring the minute variations of gravity, provided data to determine the shape and depth of the bedrock. At each stop, the astronauts read the LTG readings over voice communications link to Mission Control. Twenty-six measurements were successfully taken during the first, second and third traverses. This was fortunate, since the similar Lunar Surface Gravimeter (LSG) experiment, part of the ALSEP, failed to function due to a design error.
The other experiment, known as the Surface Electrical Properties (SEP) experiment looked for layering in Taurus-Littrow soil by transmitting radio waves into the Moon surface, using interferometry from the radio wave returns, and identifying the layers of the lunar soil. Readings were taken at each stop, with the SEP transmitter set up each time a distance away from the LRV, and the receiver mounted on the front of the LRV receiving the reflected radio signal.
|
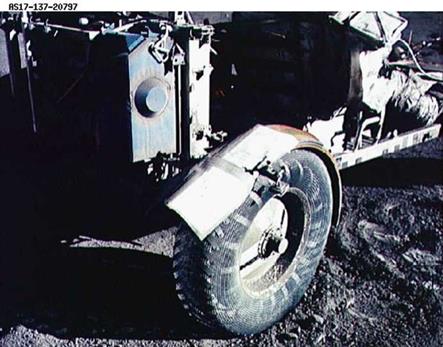
Fig. 9.12 History’s First Extraterrestrial Fender Bender and Body Repair! Courtesy of NASA |
An interesting and historically humorous footnote to the Apollo 17 mission was mankind’s first car accident and car repair on another world. Figure 9.12 shows the makeshift repair on the right rear fender of the lunar rover. Apparently during the first EVA, Gene Cernan brushed against the Lunar Rover, and a hammer in his spacesuit shin pocket caught the LRV’s right rear fender and knocked off half of it. As a result of the broken fender, the rover kicked up a dust plume while moving. The dark dust covered the astronauts, which absorbed the heat from the sunlight and could potentially cause overheating problems for Cernan and Schmitt. The abrasive moon dust also could cause scratching of the astronauts’ visors, and affect the operation of the various latches, hinges, and joints of the LRV. At the beginning of EVA 2, using the universal fix-all duct tape, Cernan was able to re-attach the fender piece after two tries. The taped on fender lasted for over four of the 7 hours EVA 2. However, the duct tape lost some of its stickiness because of the ubiquitous moon dust. For the rest of EVA 2, time was lost as the astronauts frequently used a moon dust brush to clean off the LRV, equipment and themselves. During the break between EVA’s, Cernan and Schmitt fashioned a makeshift fender out of four laminated maps and duct tape while inside the relatively cleaner LM. The tape worked better this time, and the new fender was attached by using clamps from the optical alignment telescope lamp. The makeshift fender lasted for the all of EVA 3.
|
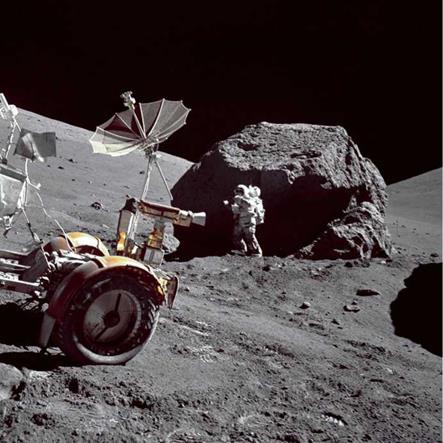
Fig. 9.13 A large lunar Rock during found during an LRV traverse. Courtesy of NASA |
Boulders of various sizes are scattered throughout the Taurus-Littrow valley. At the ALSEP area, deployed west of the Apollo 17 landing site, the boulders averaged about 4 m in size and were found to be more numerous than in other areas of the valley. Figure 9.13 illustrates the large rock where one of the LSPE geophones was placed.
|
Fig. 9.14 An LSPE explosive charge. Courtesy of NASA |
The LSPE included explosive charges that were placed at distances away from the geophones, which when activated, sent shock waves through the lunar soil. A total of eight charges were deployed at distances of between 100 m and 3.5 km from the LSPE at the ALSEP site. The charges were detonated after the astronauts left the surface. The direct shock waves data from the geophones were compared with delayed waves from the detonations to determine the depth of the rock bed beneath the soil.
In light of the near-disaster of Apollo 13 due to an explosion, the safety of the LSPE explosive charges was a priority for the Apollo 17 mission. To assure safety from accidental or inadvertent detonation, the design of the explosive charges needed three safety rings pulled during deployment of the charge to enable three separate subsystems to activate simultaneously. One safety ring activated a timer
that after 90 hours allowed the explosive to be detonated. The second safety ring released the physical barrier that separated the detonator from the explosive charge. The third safety ring activated the battery that provided power to the receiver and firing circuitry for one minute. With the three rings pulled, three independent actions were needed to cause the explosion: the battery timer had to activate to allow power to the firing mechanisms, the sliding physical barrier that separated the detonator from the explosives had to slide into firing position, and a radio signal from NASA on Earth had to be sent to detonate. If the activation radio signal was not transmitted and received within the one minute time window, the device would move the sliding barrier back into the safe position. The explosives charges could not be activated until after 90 hours, well past the time for liftoff of the LM ascent module for its rendezvous with the command module.
|
|
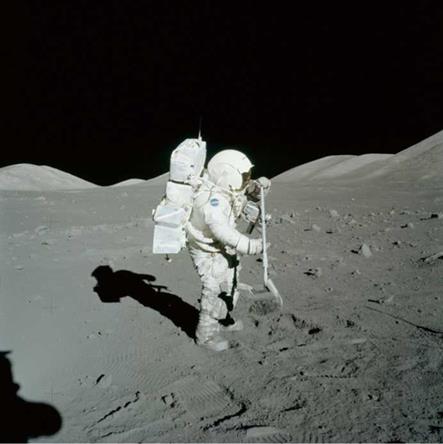
The astronauts used a number of devices to take lunar surface samples. Figure 9.15 photo shows Jack Schmitt taking a drive tube sample. These 18-in. drive tubes were either pushed into or driven into the lunar surface to collect a short core sample. Two or three drive tubes could be joined together to create a longer, depth core sample. The depth of the core sample was often determined by the density of the soil. Softer soil enabled the astronauts to physically sample greater depths, while hard dense soils limited the sample size.
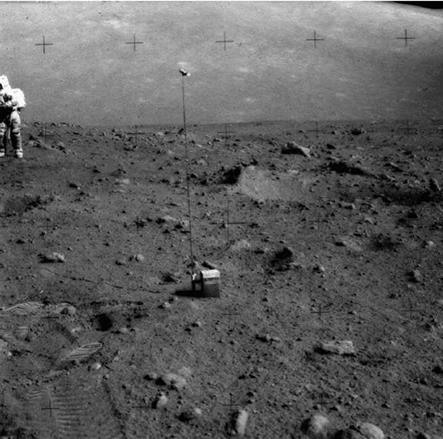
The gnomon device was used to provide a physical scale and to color calibrate photos of lunar terrain and samples. One of the difficulties encountered during the Apollo missions was the underestimation of size and distances by the astronauts. The gnomon device provided a reference for determining physical scale. At one point, from his voice transcription at 140:58:51 and his journal notes of the Second EVA second traverse to Geology Station 2, Jack Schmitt used his own shadow as a ruler. His mission notes acknowledges that “everyone underestimates distance on the Moon”. He would call to mission control to check his shadow length from the television image uplinked from the LRV camera to give an estimate of scale. Even mission commander Cernan admitted misjudging distance on the Moon.
|
|
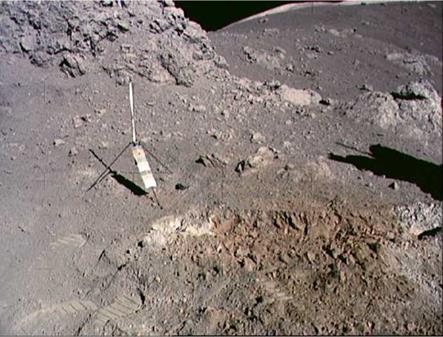
One of the discoveries made during Apollo 17 was uncovering orange soil during EVA 2. None of the previous Apollo missions ever uncovered this orange-hue soil. The orange soil was first identified by Jack Schmitt on the fourth stop of the second traverse. It pays to have a scientist on the mission!
|
|
A magnified view of the spheres and fragments in the “orange” soil which was brought back from the Taurus-Littrow landing site by the Apollo 17 crewmen may be seen In Fig. 9.17. Scientist-astronaut Harrison H. “Jack” Schmitt discovered the “orange” soil at Shorty Crater during the second Apollo 17 lunar surface extravehicular activity (EVA). The orange and dark glass beads provided clear evidence of volcanic fire fountains to geologists.
|
Fig. 9.18 The Lunar Neutron Probe Experiment. Courtesy of NASA |
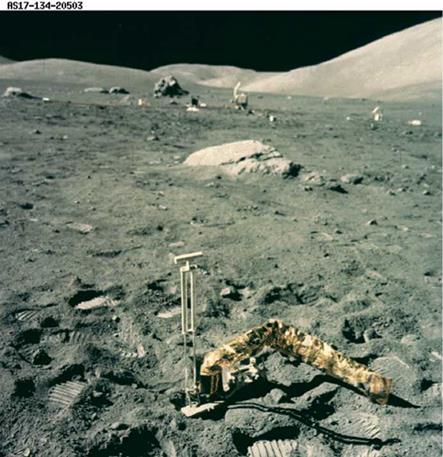
At the end of the third and final traverse, the 2-m long probe for the Lunar Neutron Probe Experiment (LNPE) was retrieved and deactivated at the end of the third EVA after 49 hours of exposure. The LNPE was designed to obtain data on neutron capture rates in the lunar regolith as a function of depth. The LNPE was an outgrowth from the analyses conducted of lunar samples returned from the Apollo 11 mission. In an effort by scientists to understand the processes that created the lunar soil, early studies indicated that neutron capture of certain isotopes of samarium and gadolinium were involved. The experiment was to gather data that would enable scientists to estimate the age of the lunar soil. The LNPE was deployed northwest of the lunar module in the hole from the deep drill core. Figure 9.18 shows the gold-colored Mylar transport bag and the treadle used for recovering the deep drill core.
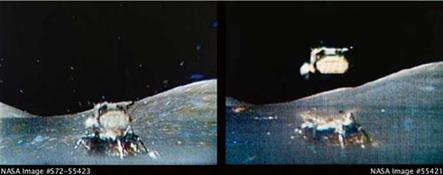
The last view of the LM Challenger descent stage taken by the Apollo 17 remote video camera is shown in Fig. 9.19. A little known fact about the televised liftoff of Challenger from the Moon’s surface is that the television camera was manually controlled from Mission Control. The NASA controller manually panned the remote controlled camera 2 seconds ahead of the LM launch to compensate for the delay time of the transmission to the Moon. Millions of television viewers on Earth were treated to a live broadcast of the LM liftoff because of this carefully planned and executed action.
|
Fig. 9.19 Challenger’s liftoff from the Moon. Courtesy of NASA |
The television broadcasted launch of the LM Challenger culminated the evolution of Apollo television cameras. The lunar-surface images provided by the cameras used on Apollo 15, 16, and 17 were of much higher quality than those used in the earlier Apollo missions. The Apollo television camera used on Apollo 11 was of poor quality, producing blobby low resolution black-and white images. The color cameras used during the Apollo 12 and 14 missions were too light sensitive, with the Apollo 12 astronauts burning out the video tube by pointing it at a reflected surface of the LM. Apollo 14 television images showed Astronauts Alan Shepard and Edgar Mitchell as white blobs most of the time. By the J-missions, a high quality color camera had been designed, implemented, and space and lunar qualified for use.
After the LM Challenger ascent stage rendezvoused with the CM America, the Challenger ascent stage was sent crashing into the Moon, with the ALSEP geophones left behind by Apollo 12, 14, 15, 16, and 17 recording the impact. NASA reported the ascent stage impacted the Moon at coordinates 19.96 N, 30.50E at 1:50 EST on 15 Dec 1972.
The spent Saturn IVB third stage for Apollo 17 impacted the lunar surface at 4.21S latitude, 12.31 W longitude at 3:32:42 pm EST on 10 Dec 1972.
As of this writing, Apollo 17 has proved to be the last time man has set foot on the Moon.


